I've written about NSMnow a few times before and I'm a big fan. They already had at least partial support for Fedora and I suggested to the developers some changes that would allow them to also support RHEL/CentOS. The SecurixLive team has done an amazing job with NSMnow (and Barnyard2) and things just keep getting better!
You can read more at the SecurixLive site:
Install Sguil on Fedora/RHEL/CentOS using NSMnow
Sunday, September 6, 2009
Tuesday, August 25, 2009
SANS 401 Mentor class coming to Augusta!
I'll be mentoring SANS 401 Security Essentials in Augusta, GA on Tuesday nights starting January 12, 2010. ISSA members are eligible for a 25% discount!
SANS 401 Security Essentials mentored by Doug Burks in Augusta GA
Why should you take SANS 401 Security Essentials?
* Are you a Systems Administrator or Network Engineer who would like to learn more about security? This course gives a very thorough overview of security theory and practice. Additionally, the tools and techniques that you learn in this class are directly applicable to your current job (and will prepare you for the future).
* DoD 8570 Compliance. If you work for the Department of Defense (or would like to), DoD Mandate 8570 requires security certification for any employee performing Information Assurance (security) work. The Security Essentials certification is among those required for 8570. For more information, please see the SANS 8570 page.
* Complement your CISSP. If you've already taken the CISSP, SANS 401 Security Essentials is the perfect technical complement. It takes all the theory that you learned at a high level for the CISSP and applies it in a very practical and updated manner. SANS 401 is "where the rubber meets the road".
* Augment your Windows/Linux skills. Highly experienced with Windows, but not so much with Linux? Or the other way around? SANS 401 Security Essentials dedicates an entire section to Windows security and another entire section to Linux security.
* Considering the SANS GSE (GIAC Security Expert) or SANS Masters program? SANS 401 Security Essentials is required for both.
These are just a few reasons to register for SANS 401 Security Essentials. For more information, please see:
SANS 401 Security Essentials mentored by Doug Burks in Augusta GA
Don't forget that ISSA members are eligible for a 25% discount! If you would like to register for the ISSA and/or SANS 401, please let me know and I'll be glad to help get you registered.
SANS 401 Security Essentials mentored by Doug Burks in Augusta GA
Why should you take SANS 401 Security Essentials?
* Are you a Systems Administrator or Network Engineer who would like to learn more about security? This course gives a very thorough overview of security theory and practice. Additionally, the tools and techniques that you learn in this class are directly applicable to your current job (and will prepare you for the future).
* DoD 8570 Compliance. If you work for the Department of Defense (or would like to), DoD Mandate 8570 requires security certification for any employee performing Information Assurance (security) work. The Security Essentials certification is among those required for 8570. For more information, please see the SANS 8570 page.
* Complement your CISSP. If you've already taken the CISSP, SANS 401 Security Essentials is the perfect technical complement. It takes all the theory that you learned at a high level for the CISSP and applies it in a very practical and updated manner. SANS 401 is "where the rubber meets the road".
* Augment your Windows/Linux skills. Highly experienced with Windows, but not so much with Linux? Or the other way around? SANS 401 Security Essentials dedicates an entire section to Windows security and another entire section to Linux security.
* Considering the SANS GSE (GIAC Security Expert) or SANS Masters program? SANS 401 Security Essentials is required for both.
These are just a few reasons to register for SANS 401 Security Essentials. For more information, please see:
SANS 401 Security Essentials mentored by Doug Burks in Augusta GA
Don't forget that ISSA members are eligible for a 25% discount! If you would like to register for the ISSA and/or SANS 401, please let me know and I'll be glad to help get you registered.
Sunday, August 16, 2009
Security Onion on Google Code and Google Groups
I've been getting more and more feedback on each successive release of the Security Onion LiveCD. Thanks to all those who've sent in your questions and comments! To help facilitate a better discussion, I've created a Google Code project and a Google Groups mailing list for Security Onion:
Security Onion on Google Code
Security Onion Wiki
Security Onion Issue Tracker
Security Onion Mailing List
Please take a look and let me know what you think!
Security Onion on Google Code
Security Onion Wiki
Security Onion Issue Tracker
Security Onion Mailing List
Please take a look and let me know what you think!
Monday, August 3, 2009
Security Onion LiveCD 20090731
A new version of the Security Onion LiveCD has been released! Here's the changelog:
2009/07/31: New Release!
* All Xubuntu 9.04 updates as of 2009/07/31.
* Added sqlite and libsqlite3-ruby packages for db_autopwn.
* Added fwbuilder.
* Latest Metasploit msf v3.3-dev as of 2009/07/31.
* Latest Nmap 5.05BETA1 as of 2009/07/31.
The Security Onion LiveCD can be downloaded from the following location:
http://distro.ibiblio.org/pub/linux/distributions/security-onion/
Please let me know if you have any questions or suggestions.
2009/07/31: New Release!
* All Xubuntu 9.04 updates as of 2009/07/31.
* Added sqlite and libsqlite3-ruby packages for db_autopwn.
* Added fwbuilder.
* Latest Metasploit msf v3.3-dev as of 2009/07/31.
* Latest Nmap 5.05BETA1 as of 2009/07/31.
The Security Onion LiveCD can be downloaded from the following location:
http://distro.ibiblio.org/pub/
Please let me know if you have any questions or suggestions.
Wednesday, July 29, 2009
Using Metasploit's db_autopwn on the Security Onion LiveCD
UPDATE: This issue has been fixed in the Security Onion LiveCD 20090731 release.
I was testing the new Security Onion LiveCD yesterday and trying to use Metasploit's db_autopwn function. The first step of db_autopwn is to create a database to hold the information about your potential targets. This is done with the db_create command. When I issued this command, I got an error about sqlite3 (the default database driver for db_autopwn).
I had forgotten to install the sqlite and libsqlite3-ruby packages. If you're having this problem, you can fix it with the following command:
sudo aptitude -y install sqlite libsqlite3-ruby
This will be fixed in the next release of the Security Onion LiveCD.
securityonion@securityonion:/usr/local/bin/framework3$ ./msfconsole
=[ msf v3.3-dev
+ -- --=[ 392 exploits - 234 payloads
+ -- --=[ 20 encoders - 7 nops
=[ 168 aux
msf > db_create
[*] Creating a new database instance...
[-] Error while running command db_create: no such file to load -- sqlite3
msf > quit
securityonion@securityonion:/usr/local/bin/framework3$ sudo aptitude -y install sqlite libsqlite3-ruby
Reading package lists... Done
Building dependency tree
Reading state information... Done
Reading extended state information
Initializing package states... Done
The following NEW packages will be installed:
libsqlite0{a} libsqlite3-ruby libsqlite3-ruby1.8{a} sqlite
0 packages upgraded, 4 newly installed, 0 to remove and 0 not upgraded.
Need to get 247kB of archives. After unpacking 811kB will be used.
Writing extended state information... Done
Get:1 http://archive.ubuntu.com jaunty/main libsqlite0 2.8.17-4build1 [176kB]
Get:2 http://archive.ubuntu.com jaunty/universe libsqlite3-ruby1.8 1.2.4-2 [51.3kB]
Get:3 http://archive.ubuntu.com jaunty/universe libsqlite3-ruby 1.2.4-2 [4042B]
Get:4 http://archive.ubuntu.com jaunty/main sqlite 2.8.17-4build1 [16.2kB]
Fetched 247kB in 1s (150kB/s)
Selecting previously deselected package libsqlite0.
(Reading database ... 118520 files and directories currently installed.)
Unpacking libsqlite0 (from .../libsqlite0_2.8.17-4build1_i386.deb) ...
Selecting previously deselected package libsqlite3-ruby1.8.
Unpacking libsqlite3-ruby1.8 (from .../libsqlite3-ruby1.8_1.2.4-2_i386.deb) ...
Selecting previously deselected package libsqlite3-ruby.
Unpacking libsqlite3-ruby (from .../libsqlite3-ruby_1.2.4-2_all.deb) ...
Selecting previously deselected package sqlite.
Unpacking sqlite (from .../sqlite_2.8.17-4build1_i386.deb) ...
Processing triggers for man-db ...
Setting up libsqlite0 (2.8.17-4build1) ...
Setting up libsqlite3-ruby1.8 (1.2.4-2) ...
Setting up libsqlite3-ruby (1.2.4-2) ...
Setting up sqlite (2.8.17-4build1) ...
Processing triggers for libc6 ...
ldconfig deferred processing now taking place
Reading package lists... Done
Building dependency tree
Reading state information... Done
Reading extended state information
Initializing package states... Done
Writing extended state information... Done
securityonion@securityonion:/usr/local/bin/framework3$ ./msfconsole
=[ msf v3.3-dev
+ -- --=[ 392 exploits - 234 payloads
+ -- --=[ 20 encoders - 7 nops
=[ 168 aux
msf > db_create
[*] Creating a new database instance...
[*] Successfully connected to the database
[*] File: /home/securityonion/.msf3/sqlite3.db
msf >
Tuesday, July 28, 2009
Security Onion LiveCD 20090724
A new version of the Security Onion LiveCD has been released! Here's the changelog:
* All Xubuntu 9.04 updates as of 2009/07/24.
* Added a Security Onion section to the Applications menu.
* Latest Metasploit msf v3.3-dev as of 2009/07/24.
* Latest Nmap as of 2009/07/24.
The Security Onion LiveCD can be downloaded from the following location:
http://distro.ibiblio.org/pub/linux/distributions/security-onion/
Please let me know if you have any questions or suggestions.
* All Xubuntu 9.04 updates as of 2009/07/24.
* Added a Security Onion section to the Applications menu.
* Latest Metasploit msf v3.3-dev as of 2009/07/24.
* Latest Nmap as of 2009/07/24.
The Security Onion LiveCD can be downloaded from the following location:
http://distro.ibiblio.org/pub/
Please let me know if you have any questions or suggestions.
Saturday, July 11, 2009
Know Thy ISP
From http://www.pcworld.com/article/168160/ussouth_korea_cyberattack_lessons_learned.html:
"Investigators may not yet know who was behind a series of cyberattacks on the U.S. and South Korea, but analysts are getting a better grasp on where the nations' governments may have gone wrong. Numerous government Web sites in both countries have been hit by distributed denial-of-service attacks, starting on the Fourth of July and continuing into today. Dozens of high-profile sites have been targeted, including those of the Federal Trade Commission, the Department of Treasury, and other major federal agencies."Quote of the day:
"'Too many federal agency security people did not know which network service provider connected their Web sites to the Internet,' explains Alan Paller, director of research at the SANS Institute, a security research organization."Alan's statement is quite scary, but I'm sure quite true. When the killer clowns come knocking at your firewall's door, you need to be able to pull the plug in a hurry. Perhaps we should have Internet fire drills where we propose a mock DDoS attack and have our technicians play out the scenario. Who ya gonna call?
Friday, July 10, 2009
SANS Courses for the US-CERT GFIRST conference in August
Announcement from SANS:
"In August, SANS will be running 5 tracks in support of the US-CERT GFIRST conference taking place at the Omni Hotel at CNN Center (http://www.us-cert.gov/GFIRST/). SANS is pleased to present the following course offerings:
Security 501: Advanced Security Essentials - Enterprise Defender
http://www.sans.org/atlanta09/description.php?tid=2722
August 17-22
Security 504: Hacker Techniques, Exploits & Incident Handling
http://www.sans.org/atlanta09/description.php?tid=243
August 17-22
Security 441: Windows Forensics
http://www.sans.org/atlanta09/description.php?tid=3012
August 27-28
Security 553: Metasploit for Penetration Testers
http://www.sans.org/atlanta09/description.php?tid=3022
August 27
Security 517: Cutting-Edge Hacking Techniques
http://www.sans.org/atlanta09/description.php?tid=1927
August 28
This will be the first time we are offering Security 501 and a rare opportunity to take this course from Dr. Eric Cole in a small class setting. We are also offering 3 short courses which offer a great opportunity to get SANS content in only 1 or 2 days."
Tuesday, June 30, 2009
Suggestions for the Security Onion LiveCD
I'm currently working on the next version of the Security Onion LiveCD. What specific packages/features would you like to see added to the Security Onion LiveCD? Post a comment here or contact me on Twitter. Thanks!
Tuesday, June 16, 2009
Security Onion LiveCD 20090613
A new version of the Security Onion LiveCD is now available! Here's the changelog:
-All Xubuntu 9.04 updates as of 2009/06/13.
-Added JJ Cummings's pulledpork as an alternative to oinkmaster. All pulledpork files are in:
/usr/local/bin/pulledpork/
-Added Leon Ward's dumbpig for checking custom Snort rules:
/usr/local/bin/dumbpig.pl
-Added Bro IDS for Marcus J. Carey. All Bro files are in:
/usr/local/bro/
The Security Onion LiveCD can be downloaded from the following location:
http://distro.ibiblio.org/pub/linux/distributions/security-onion/
UPDATE: Some ibiblio mirrors are showing an index page which contains no links. Here are the direct links to the ISO and MD5 file:
http://distro.ibiblio.org/pub/linux/distributions/security-onion/security-onion-livecd-20090613.iso
http://distro.ibiblio.org/pub/linux/distributions/security-onion/security-onion-livecd-20090613.md5
-All Xubuntu 9.04 updates as of 2009/06/13.
-Added JJ Cummings's pulledpork as an alternative to oinkmaster. All pulledpork files are in:
/usr/local/bin/pulledpork/
-Added Leon Ward's dumbpig for checking custom Snort rules:
/usr/local/bin/dumbpig.pl
-Added Bro IDS for Marcus J. Carey. All Bro files are in:
/usr/local/bro/
The Security Onion LiveCD can be downloaded from the following location:
http://distro.ibiblio.org/pub/
UPDATE: Some ibiblio mirrors are showing an index page which contains no links. Here are the direct links to the ISO and MD5 file:
http://distro.ibiblio.org/pub/linux/distributions/security-onion/security-onion-livecd-20090613.iso
http://distro.ibiblio.org/pub/linux/distributions/security-onion/security-onion-livecd-20090613.md5
Thursday, June 4, 2009
The Security Onion LiveCD is now available!
The Security Onion LiveCD is now available! You can download it from the following location:
http://distro.ibiblio.org/pub/linux/distributions/security-onion/
What is it?
The Security Onion LiveCD is a bootable CD that contains software used for installing, configuring, and testing Intrusion Detection Systems.
What software does it contain?
The Security Onion LiveCD is based on Xubuntu 9.04 and contains Snort 2.8.4.1, Snort 3.0.0b3 (Beta), sguil, idswakeup, nmap, metasploit, scapy, hping, fragroute, fragrouter, netcat, paketto, tcpreplay, and many other security tools.
What can it be used for?
Please take a look at the Security Onion LiveCD and let me know what you think!
* Special thanks to:
http://distro.ibiblio.org/pub/
What is it?
The Security Onion LiveCD is a bootable CD that contains software used for installing, configuring, and testing Intrusion Detection Systems.
What software does it contain?
The Security Onion LiveCD is based on Xubuntu 9.04 and contains Snort 2.8.4.1, Snort 3.0.0b3 (Beta), sguil, idswakeup, nmap, metasploit, scapy, hping, fragroute, fragrouter, netcat, paketto, tcpreplay, and many other security tools.
What can it be used for?
- The Security Onion LiveCD can be used for Intrusion Detection. Simply boot the CD and double-click either the Snort-Sguil or SnortSP-Sguil desktop shortcuts. The Snort and Sguil daemons will then start, listening on eth0 for any suspicious traffic and creating alerts in the Sguil console.
- The Security Onion LiveCD can be used to test an Intrusion Detection System. Simply boot the CD and use the included tools (such as nmap, metasploit, idswakeup, scapy, hping, and others) to test your existing IDS or to test the included Snort 2.8.4.1 and Snort 3.0 Beta 3.
- The Security Onion LiveCD can be used to install an Intrusion Detection System. Simply boot the CD and double-click the Install desktop shortcut. For more information about installation, please see the README desktop shortcut.
Please take a look at the Security Onion LiveCD and let me know what you think!
* Special thanks to:
- Marty Roesch and the whole SourceFire team for all of their work these last 10 years to get Snort to where it is today.
- The Sguil team for the best open-source tool to manage Snort alerts.
- The SecurixLive crew for their awesome NSMnow installer, the easiest way to install and configure Snort/Sguil on Ubuntu Linux.
- Ubuntu (and Debian) for their well-made Linux distribution(s).
- The Reconstructor team for a very easy to use tool for remastering Ubuntu LiveCDs.
- All developers in the open-source community who work so hard and produce such amazing tools.
Thursday, May 7, 2009
Sguil on Ubuntu 9.04 in 3 Steps using NSMnow
My previous Sguil/NSMnow recipes used Ubuntu 8.04. I thought I'd play with the new Ubuntu 9.04 and see if there were any differences. It looks like there is a new AppArmor profile for tcpdump that we'll have to configure if we want to pull session transcripts using Sguil. (This is in addition to the AppArmor profile for MySQL that we were already having to configure to allow it to read the load directory.) These steps have been formatted so that you can copy/paste them into your terminal.
Disclaimer: I offer no warranties of any kind. If your box breaks, you get to keep both pieces!
Step 1: Get root privileges
Launch the Sguil client by opening a new terminal and typing the following:
Username: sguil
Password: password
Next, create some alerts by opening a browser and going to:
http://www.testmyids.com
Finally, go into the Sguil console and you should see two new alerts:
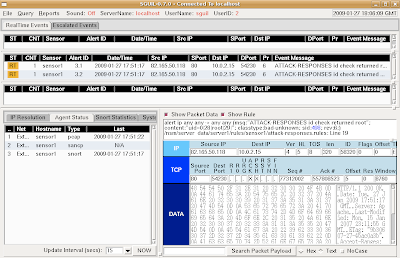
This demonstrates that Snort is analyzing packets and outputting in unified2 format, which is then read by Barnyard2 and inserted into the Sguil database.
When finished, close the Sguil window and return to your NSMnow window. Then type the following to terminate all NSMnow processes:
/usr/local/sbin/nsm --all --stop
Disclaimer: I offer no warranties of any kind. If your box breaks, you get to keep both pieces!
Step 1: Get root privileges
##########################Step 2: Install NSMnow
sudo -i
##########################
##########################Step 3: Configure AppArmor and start NSMnow
mkdir /usr/local/src/NSMnow
cd /usr/local/src/NSMnow
wget http://www.securixlive.com/download/nsmnow/NSMnow-1.4.0.tar.gz
tar zxvf NSMnow-1.4.0.tar.gz
./NSMnow -i -y
##########################
##########################Snort is now capturing packets on eth0 and analyzing them. Let's verify that now.
if ! grep "/nsm/server_data/server1/load" /etc/apparmor.d/usr.sbin.mysqld > /dev/null
then
# Remove the last line of the file (a single right curly brace)
sed -i '$d' /etc/apparmor.d/usr.sbin.mysqld
# Add a line that allows MySQL to read the load directory
echo " /nsm/server_data/server1/load/* r," >> /etc/apparmor.d/usr.sbin.mysqld
# Append the right curly brace to end the file
echo "}" >> /etc/apparmor.d/usr.sbin.mysqld
fi
if ! grep "/nsm/sensor_data/sensor1/dailylogs" /etc/apparmor.d/usr.sbin.tcpdump > /dev/null
then
# Remove the last line of the file (a single right curly brace)
sed -i '$d' /etc/apparmor.d/usr.sbin.tcpdump
# Add a line that allows tcpdump to read all dailylogs
echo " /nsm/sensor_data/sensor1/dailylogs/**[^/] r," >> /etc/apparmor.d/usr.sbin.tcpdump
echo "}" >> /etc/apparmor.d/usr.sbin.tcpdump
fi
/etc/init.d/apparmor restart
/usr/local/sbin/nsm --all --start
##########################
Launch the Sguil client by opening a new terminal and typing the following:
##########################When prompted, login to Sguil using the default credentials:
sguil.tk
##########################
Username: sguil
Password: password
Next, create some alerts by opening a browser and going to:
http://www.testmyids.com
Finally, go into the Sguil console and you should see two new alerts:

This demonstrates that Snort is analyzing packets and outputting in unified2 format, which is then read by Barnyard2 and inserted into the Sguil database.
When finished, close the Sguil window and return to your NSMnow window. Then type the following to terminate all NSMnow processes:
/usr/local/sbin/nsm --all --stop
Thursday, April 23, 2009
Announcing Detroit Dave's Raves
One of my SANS 503 Mentor students has started his own blog. Check it out at:
http://detroitdavesraves.blogspot.com/
http://detroitdavesraves.blogspot.com/
Friday, April 17, 2009
How a Single Piece of Paper Can Saturate a WAN Link
At work, one of our remote business units was experiencing slowness in their WAN link. Our Network Architect began looking into the problem and found that one particular device on their network was sending enormous amounts of traffic over the link. Looking into it further, he discovered that the device was one of our security cameras in the business unit's server room. He then came to see us and asked about the camera.
This particular camera is motion-activated and therefore shouldn't have been capturing all the time, but it was. We looked at some of the videos and, at first, didn't see anything out of the ordinary. After racking our brains for a few minutes, we finally noticed that there was a piece of paper taped to the front of one of the server racks. The paper was taped in the middle, allowing the sides to flap in the wind of the air conditioner. This created just enough motion to trigger the camera to record and transmit its video.
All of this resulted in a call to the technician at the business unit that went something like this:
"We've discovered the problem with your WAN link. Please go to your server room and remove the piece of paper taped to the front of the server rack. Your WAN link should then magically speed up. Thank you."My modest proposal is that paper is obviously increasing our bandwidth costs and we should therefore go completely paperless.
Wednesday, April 15, 2009
SANS GCIA Gold Paper on Snort 3.0 Beta 3
My SANS GCIA Gold Paper on Snort 3.0 Beta 3 has been posted to the SANS Reading Room!
Friday, April 10, 2009
Wireshark 1.0.7 is out!
Wireshark 1.0.7 has been released. Please upgrade ASAP! For more information about the release, please see:
http://www.wireshark.org/docs/relnotes/wireshark-1.0.7.html
http://www.wireshark.org/docs/relnotes/wireshark-1.0.7.html
Snort 2.8.4 is out!
Snort 2.8.4 has been released. From http://www.snort.org/pub-bin/snortnews.cgi#864:
http://www.snort.org/vrt/advisories/vrt-rules-2009-04-08.html
Snort 2.8.4 is now available on snort.org, at http://www.snort.org/dl/For more information about the new DCERPC rules, please see:
Snort 2.8.4 introduces:
- A revised DCE/RPC preprocessor with more rule options
With the new DCE/RPC preprocessor, there will be a number of updates to the rules. Please be sure to update your rules to the latest when that package is available (next few days).
- Support for IPv6 in Frag3 and all application preprocessors
- Improved target-based support in preprocessors
- Option to automatically pre-filter traffic that is not inspected in order to improve performance
- Several other improvements and fixes
Please see the release notes and changelog for more details.
Please submit bugs, questions, and feedback to bugs@snort.org.
Happy Snorting!
The Snort Release Team
http://www.snort.org/vrt/advisories/vrt-rules-2009-04-08.html
Monday, April 6, 2009
Snort 3.0 (SnortSP) Beta 3 -- Inline Bridging Mode in 3 Steps
To complete the updating of my 3-part series on Installing and Configuring Snort 3 Beta 3, I now present to you the final chapter in this trilogy: the updated recipe for Snort 3 Inline Bridging Mode in 3 Steps. Snort 3.0 Beta 3 has changed the syntax for creating a new dsrc, so this has been reflected in the new recipe.
Step 1: Add a new function to your snort.lua file
If you followed the updated Snort 3.0 Beta 3 Installation HOWTO, then the default snort.lua file is in /etc/snortsp/snort.lua. Open the file and add the following function:
Step 2: Start SnortSP
Start SnortSP using the following command:
Step 3: Use the bridge() function
In the Lua shell, type the following (replacing eth0 and eth1 with the correct interfaces on your system):
Once the bridge is up and running, you can do the following to display packets traversing the bridge:
When finished, shut down SnortSP by running the following command:
Step 1: Add a new function to your snort.lua file
If you followed the updated Snort 3.0 Beta 3 Installation HOWTO, then the default snort.lua file is in /etc/snortsp/snort.lua. Open the file and add the following function:
function bridge (interface1, interface2)
if interface2 == nil then
error("Two interface strings must be specified ( e.g. bridge(\"eth0\", \"eth1\") )")
end
dsrc1 = {name="src1",
type="afpacket",
intf=interface1..":"..interface2,
flags=10,
snaplen=1514,
display="none",
tcp={maxflows=262144, maxidle=30, flow_memcap=10000000},
other={maxflows=131072, maxidle=30, flow_memcap=1000000},
cksum_mode=0x0,
}
dsrc.new(dsrc1)
eng.new({name="e1"})
eng.link({engine="e1", source="src1"})
eng.start("e1")
end
Step 2: Start SnortSP
Start SnortSP using the following command:
sudo snortsp -L /etc/snortsp/snort.luaSnortSP will start up and read your new snort.lua file. You will then be greeted by the SnortSP Lua shell.
Step 3: Use the bridge() function
In the Lua shell, type the following (replacing eth0 and eth1 with the correct interfaces on your system):
bridge("eth0", "eth1")
Once the bridge is up and running, you can do the following to display packets traversing the bridge:
eng.set_display({engine="e1", display="none"})
Press the Up arrow and change "none" to "classic".
View the output.
Press the Up arrow twice to retrieve the "none" command and press Enter.
When finished, shut down SnortSP by running the following command:
ssp.shutdown()
Sunday, April 5, 2009
Integrating Snort 3.0 Beta 3 and Sguil in 3 Steps
Since I updated the "Installing Snort 3.0 Beta on Ubuntu 8.04" post to work with Snort 3.0 Beta 3, here's the update for the "Integrating Snort 3.0 (SnortSP) and Sguil in 3 Steps" post. Since the original post, NSMnow 1.3.5 has been released, so the URL has been updated in the recipe to reflect this new version. Also, there appears to be a bug in the current sspiffy.sh whereby it configures the dsrc type to be "file" instead of "pcap". I added a quick one-liner to correct this in the snort.lua file.
Please note that if you have an existing NSMnow installation, following this recipe may or may not work. This recipe is designed for new NSMnow installations.
The best open source tool to manage Snort alerts is Sguil and the easiest way to install Sguil is using NSMnow. NSMnow automatically installs and configures barnyard2 (compatible with SnortSP's unfied2 format), sancp, Sguil, and Snort 2.x. We're going to replace NSMnow's snort alert process with Snort 3.0.
This quick recipe assumes that you're running on Ubuntu 8.04 and your primary network interface is eth0. You should be able to copy/paste each of the three code blocks into your terminal.
Obligatory disclaimer: I offer no warranty of any kind. If this breaks your box, you get to keep both pieces.
Step 1: Get root privileges
Launch the Sguil client by opening a new terminal and typing the following:
Username: sguil
Password: password
Next, create some alerts by opening a browser and going to:
http://www.testmyids.com
Finally, go into the Sguil console and you should see two new alerts:
This demonstrates that SnortSP is capturing packets, analyzing them with the Snort 2.8.2 Detection Engine, and outputting in unified2 format, which is then read by Barnyard2 and inserted into the Sguil database.
When finished, return to your SnortSP window and press ctrl-c to terminate the SnortSP process. Then type "nsm --all --stop" to terminate all NSMnow processes.
Please note that if you have an existing NSMnow installation, following this recipe may or may not work. This recipe is designed for new NSMnow installations.
The best open source tool to manage Snort alerts is Sguil and the easiest way to install Sguil is using NSMnow. NSMnow automatically installs and configures barnyard2 (compatible with SnortSP's unfied2 format), sancp, Sguil, and Snort 2.x. We're going to replace NSMnow's snort alert process with Snort 3.0.
This quick recipe assumes that you're running on Ubuntu 8.04 and your primary network interface is eth0. You should be able to copy/paste each of the three code blocks into your terminal.
Obligatory disclaimer: I offer no warranty of any kind. If this breaks your box, you get to keep both pieces.
Step 1: Get root privileges
##########################Step 2: Install NSMnow
sudo -i
##########################
##########################Step 3: Configure NSMnow and SnortSP and start
mkdir /usr/local/src/NSMnow
cd /usr/local/src/NSMnow
wget http://www.securixlive.com/download/nsmnow/NSMnow-1.3.5.tar.gz
tar zxvf NSMnow-1.3.5.tar.gz
./NSMnow -i -y
##########################
##########################Snort 3.0 is now capturing packets on eth0 and analyzing them. Let's verify that now.
if ! grep "/nsm/server_data/server1/load" /etc/apparmor.d/usr.sbin.mysqld > /dev/null
then
sed -i 's|}| /nsm/server_data/server1/load/* r,|g' /etc/apparmor.d/usr.sbin.mysqld
echo "}" >> /etc/apparmor.d/usr.sbin.mysqld
fi
/etc/init.d/apparmor restart
/usr/local/sbin/nsm --server --start
/usr/local/sbin/nsm_sensor_ps-start --skip-snort-alert
mkdir /etc/snortsp_alert
cd /etc/snortsp_alert
cp -R /etc/nsm/sensor1/* .
mv snort.conf snort_orig.conf
sspiffy.sh /usr/local -c snort_orig.conf -i eth0
sed -i 's|type="file"|type="pcap"|g' snort.lua
grep -v "sameip" rules/bad-traffic.rules > rules/bad-traffic.rules.2
rm -f rules/bad-traffic.rules
mv rules/bad-traffic.rules.2 rules/bad-traffic.rules
snortsp -C -L snort.lua
##########################
Launch the Sguil client by opening a new terminal and typing the following:
##########################When prompted, login to Sguil using the default credentials:
sguil.tk
##########################
Username: sguil
Password: password
Next, create some alerts by opening a browser and going to:
http://www.testmyids.com
Finally, go into the Sguil console and you should see two new alerts:
This demonstrates that SnortSP is capturing packets, analyzing them with the Snort 2.8.2 Detection Engine, and outputting in unified2 format, which is then read by Barnyard2 and inserted into the Sguil database.
When finished, return to your SnortSP window and press ctrl-c to terminate the SnortSP process. Then type "nsm --all --stop" to terminate all NSMnow processes.
Saturday, April 4, 2009
Installing Snort 3.0 (SnortSP) Beta 3 on Ubuntu 8.04 in 3 Steps
Snort 3.0 Beta 3 was released on April 1. You can read an overview of the changes in Snort 3.0 Beta 3 in the mailing list announcement. For more details on the underlying architectural changes in Beta 3, see Marty Roesch's blog. Thanks to Marty and the rest of the Snort 3 Development Team for their hard work in this release!
Installing Snort 3.0 Beta 3 on Ubuntu 8.04 is almost identical to installing Snort 3.0 Beta 2 on Ubuntu 8.04. However, I did have an issue with the Snort 2.8 Detection Engine not compiling correctly. This turned out to be libtool not liking the fact that /bin/sh was symlinked to /bin/dash instead of /bin/bash. The one-line fix was:
Here's the complete install recipe that worked for me:
Step 1: Get root privileges
Installing Snort 3.0 Beta 3 on Ubuntu 8.04 is almost identical to installing Snort 3.0 Beta 2 on Ubuntu 8.04. However, I did have an issue with the Snort 2.8 Detection Engine not compiling correctly. This turned out to be libtool not liking the fact that /bin/sh was symlinked to /bin/dash instead of /bin/bash. The one-line fix was:
rm /bin/sh && ln -s /bin/bash /bin/sh(Special thanks to Russ Combs of the SnortSP development team for his assistance with this issue.)
Here's the complete install recipe that worked for me:
Step 1: Get root privileges
##########################Step 2: Install dependencies
sudo -i
##########################
##########################Step 3: Download, compile, and install Snort 3.0 Beta 3
aptitude update
aptitude -y install build-essential \
libdumbnet1 libdumbnet-dev \
uuid uuid-dev \
libncurses5 libncurses5-dev \
libreadline5 libreadline5-dev \
libpcap0.8 libpcap0.8-dev \
libpcre3 libpcre3-dev \
liblua5.1-0 liblua5.1-0-dev \
flex bison
##########################
##########################
rm /bin/sh && ln -s /bin/bash /bin/sh
cd /usr/local/src/
wget http://dl.snort.org/snortsp/\
snortsp-3.0.0b3.tar.gz
tar zxvf snortsp-3.0.0b3.tar.gz
cd snortsp-3.0.0b3/
./configure
make
make install
mkdir /etc/snortsp/
cp etc/* /etc/snortsp/
cd src/analysis/snort/
./configure \
--with-platform-includes=/usr/local/include \
--with-platform-libraries=/usr/local/lib
make
make install
ldconfig
##########################
Monday, February 2, 2009
Snort 3.0 (SnortSP) Inline Bridging Mode in 3 Steps
One of the many interesting new features in Snort 3.0 (SnortSP) is the ability to run in inline bridging mode.
Step 1: Add a new function to your snort.lua file
If you followed my previous SnortSP Installation HOWTO, then the default snort.lua file is in /etc/SnortSP/snort.lua. Open the file and add the following function:
Step 2: Start SnortSP
Start SnortSP using the following command:
Step 3: Use the bridge() function
In the Lua shell, type the following (replacing eth0 and eth1 with the correct interfaces on your system):
Once the bridge is up and running, you can do the following to display packets traversing the bridge:
When finished, shut down SnortSP by running the following command:
Note that there is a bug in the SnortSP README file (and/or the SnortSP afpacket DAQ itself). The README file suggests the following:
Setting snaplen to 0 and passing traffic through the bridge results in segmentation fault. Per the SnortSP developers, this value should be set to 1518 for normal ethernet operation. Thanks to the SnortSP developers for their assistance with this issue.
Step 1: Add a new function to your snort.lua file
If you followed my previous SnortSP Installation HOWTO, then the default snort.lua file is in /etc/SnortSP/snort.lua. Open the file and add the following function:
function bridge(interface1, interface2)
if interface1 == nil then
error("Two interfaces must be specified ( e.g. bridge(\"eth0\", \"eth1\") )")
end
if interface2 == nil then
error("Two interfaces must be specified ( e.g. bridge(\"eth0\", \"eth1\") )")
end
dsrc2 = {name="src2",
type="afpacket",
intf=interface1..":"..interface2,
flags=10,
snaplen=1518,
maxflows=262144,
maxidle=300,
flow_memcap=10000000}
dsrc.new(dsrc2)
eng.new("e2")
eng.link({engine="e2", source="src2"})
eng.start("e2")
end
Step 2: Start SnortSP
Start SnortSP using the following command:
sudo snortsp -L /etc/SnortSP/snort.luaSnortSP will start up and read your new snort.lua file. You will then be greeted by the SnortSP Lua shell.
Step 3: Use the bridge() function
In the Lua shell, type the following (replacing eth0 and eth1 with the correct interfaces on your system):
bridge("eth0", "eth1")
Once the bridge is up and running, you can do the following to display packets traversing the bridge:
eng.set_display({engine="e2", display="none"})
Press the Up arrow and change "none" to "classic".
View the output.
Press the Up arrow twice to retrieve the "none" command and press Enter.
When finished, shut down SnortSP by running the following command:
ssp.shutdown()
Note that there is a bug in the SnortSP README file (and/or the SnortSP afpacket DAQ itself). The README file suggests the following:
      dsrc1 = {name="src",
             type="afpacket",
             intf="eth2:eth3",
             flags=10,
             snaplen=0,
             maxflows=262144,
             maxidle=300,
             flow_memcap=10000000}
    dsrc.new(dsrc1)
Monday, January 26, 2009
Integrating Snort 3.0 (SnortSP) and Sguil in 3 Steps
So once you have Snort 3.0 installed, what can you do with it? One thing you can do with it (and the one that most people are interested in) is to configure it for IDS mode. The Snort 3.0 architecture includes the Snort 2.8.2 Detection Engine, so we'll have the Snort Security Platform (SnortSP) capturing packets and handing them off to Snort 2.8.2 for analysis and alerting.
The best open source tool to manage Snort alerts is Sguil and the easiest way to install Sguil is using NSMnow. NSMnow automatically installs and configures barnyard2 (compatible with SnortSP's unfied2 format), sancp, Sguil, and Snort 2.x. We're going to replace NSMnow's snort alert process with Snort 3.0.
This quick recipe assumes that you're running on Ubuntu 8.04 and your primary network interface is eth0. You should be able to copy/paste each of the three code blocks into your terminal.
Obligatory disclaimer: I offer no warranty of any kind. If this breaks your box, you get to keep both pieces.
Step 1: Get root privileges
Launch the Sguil client by opening a new terminal and typing the following:
Username: sguil
Password: password
Next, create some alerts by opening a browser and going to:
http://www.testmyids.com
Finally, go into the Sguil console and you should see two new alerts:
This demonstrates that SnortSP is capturing packets, analyzing them with the Snort 2.8.2 Detection Engine, and outputting in unified2 format, which is then read by Barnyard2 and inserted into the Sguil database.
When finished, return to your SnortSP window and press ctrl-c to terminate the SnortSP process. Then type "nsm --all --stop" to terminate all NSMnow processes.
The best open source tool to manage Snort alerts is Sguil and the easiest way to install Sguil is using NSMnow. NSMnow automatically installs and configures barnyard2 (compatible with SnortSP's unfied2 format), sancp, Sguil, and Snort 2.x. We're going to replace NSMnow's snort alert process with Snort 3.0.
This quick recipe assumes that you're running on Ubuntu 8.04 and your primary network interface is eth0. You should be able to copy/paste each of the three code blocks into your terminal.
Obligatory disclaimer: I offer no warranty of any kind. If this breaks your box, you get to keep both pieces.
Step 1: Get root privileges
##########################Step 2: Install NSMnow
sudo -i
##########################
##########################Step 3: Configure NSMnow and SnortSP and start
mkdir /usr/local/src/NSMnow
cd /usr/local/src/NSMnow
wget http://www.securixlive.com/download/nsmnow/NSMnow-1.3.4.tar.gz
tar zxvf NSMnow-1.3.4.tar.gz
./NSMnow -i -y
##########################
##########################Snort 3.0 is now capturing packets on eth0 and analyzing them. Let's verify that now.
if ! grep "/nsm/server_data/server1/load" /etc/apparmor.d/usr.sbin.mysqld > /dev/null
then
sed -i 's|}| /nsm/server_data/server1/load/* r,|g' /etc/apparmor.d/usr.sbin.mysqld
echo "}" >> /etc/apparmor.d/usr.sbin.mysqld
fi
/etc/init.d/apparmor restart
/usr/local/sbin/nsm --server --start
/usr/local/sbin/nsm_sensor_ps-start --skip-snort-alert
mkdir /etc/snortsp_alert
cd /etc/snortsp_alert
cp -R /etc/nsm/sensor1/* .
mv snort.conf snort_orig.conf
sspiffy.sh /usr/local -c snort_orig.conf -i eth0
grep -v "sameip" rules/bad-traffic.rules > rules/bad-traffic.rules.2
rm -f rules/bad-traffic.rules
mv rules/bad-traffic.rules.2 rules/bad-traffic.rules
snortsp -C -L snort.lua
##########################
Launch the Sguil client by opening a new terminal and typing the following:
##########################When prompted, login to Sguil using the default credentials:
sguil.tk
##########################
Username: sguil
Password: password
Next, create some alerts by opening a browser and going to:
http://www.testmyids.com
Finally, go into the Sguil console and you should see two new alerts:
This demonstrates that SnortSP is capturing packets, analyzing them with the Snort 2.8.2 Detection Engine, and outputting in unified2 format, which is then read by Barnyard2 and inserted into the Sguil database.
When finished, return to your SnortSP window and press ctrl-c to terminate the SnortSP process. Then type "nsm --all --stop" to terminate all NSMnow processes.
Saturday, January 24, 2009
Installing Snort 3.0 (SnortSP) on Ubuntu in 3 Steps
Here's a really quick recipe for installing the Snort 3.0 Architecture on Ubuntu 8.04. Note that the Snort 3.0 Architecture consists of the SnortSP framework and the Snort 2.8.2 Detection Engine. You should be able to open a terminal and then copy/paste each of the three blocks of commands.
Step 1: Get root privileges
Future posts will cover where to go from here.
Step 1: Get root privileges
##########################Step 2: Install dependencies
sudo -i
##########################
##########################Step 3: Download, compile, and install the Snort 3.0 Architecture
aptitude update
aptitude -y install build-essential \
libdumbnet1 libdumbnet-dev \
uuid uuid-dev \
libncurses5 libncurses5-dev \
libreadline5 libreadline5-dev \
libpcap0.8 libpcap0.8-dev \
libpcre3 libpcre3-dev \
liblua5.1-0 liblua5.1-0-dev \
flex bison
##########################
##########################
cd /usr/local/src/
wget http://www.snort.org/dl/prerelease\
/3.0.0-b2/snortsp-3.0.0b2.tar.gz
tar zxvf snortsp-3.0.0b2.tar.gz
cd snortsp-3.0.0b2/
./configure
make
make install
mkdir /etc/SnortSP/
cp etc/* /etc/SnortSP/
cd src/analysis/snort/
./configure \
--with-platform-includes=/usr/local/include/snortsp \
--with-platform-libraries=/usr/local/lib
make
make install
ldconfig
##########################
Future posts will cover where to go from here.
Tuesday, January 20, 2009
NSMnow 1.3
I previously discussed the NSMnow project. These guys have made tremendous progress in the last few weeks and have fixed the bugs that I notified them of. They are now at version 1.3. Go check it out!
Sunday, January 18, 2009
SANS 503 Mentor class is full
Registration is now closed for the previously mentioned SANS 503 Mentor class here in Augusta. This was the first SANS Mentor class to sell out in a few years! Thanks to all who registered.
Saturday, January 10, 2009
Links for Binary and Hex Refreshers
If you're about to take SANS 503 and it's been a while since you've had to deal with the world of binary and hex, here are a few good links for refreshing your memory:
http://en.wikipedia.org/wiki/Hexadecimal
http://en.wikipedia.org/wiki/Binary_numeral_system
http://www.underground-security.com/downloads/crew/frostbyte/tutorials/conversions-tutorial.php
http://www.blaenkdenum.com/binary-and-hexadecimal/
http://www.permadi.com/tutorial/numHexToBin/index.html
http://atrevida.comprenica.com/atrtut01.html
http://www.sans.org/training/tcpip_quiz.php
Creating md5 and sha1 hashes using dcfldd
Have you ever been in a situation where you needed to calculate multiple hashes (md5 and sha1, for example) of a large drive image, but you didn't want to wait the long time it would take to do the following?
md5 image.dddcfldd can calculate multiple hashes at the same time. All you have to do is set dcfldd's output to /dev/null like this:
sha1 image.dd
dcfldd if=image.dd of=/dev/null hash=md5,sha1
512 blocks (16Mb) written.Total (md5): 95581c2eb1d0e18d4c9d0a08f06e1b28
Total (sha1): f80c5845df633e5ed586cf5006a746cc648abd9a
572+1 records in
572+1 records out
Friday, January 9, 2009
2009 SANS Log Management Survey
SANS is researching how organizations handle log management. Please take 5 minutes out of your day and complete the following survey (I did):
SANS Log Management Survey
SANS Log Management Survey
Thursday, January 8, 2009
Reminder about SANS 503 training here in Augusta
We have less than 2 weeks to go before the January 20 deadline for the best deal on SANS 503 Intrusion Detection training here in Augusta! If you're not an ISSA member already, you can join today (only $120.00) and take advantage of the 40% discount for ISSA members. ISSA Members who wish to register for the class should contact me or one of the other chapter leaders for the Discount Registration code.
For further information, please see:
http://www.sans.org/mentor/details.php?nid=15354
For further information, please see:
http://www.sans.org/mentor/details.php?nid=15354
Monday, January 5, 2009
Upgrading from Fedora 9 to Fedora 10 using Preupgrade
A few months ago, I upgraded from Fedora 8 to Fedora 9 using Preupgrade. Last night, I decided it was time to upgrade to Fedora 10 (F10), so I went the Preupgrade route again.
I did a yum update and then launched preupgrade. It downloaded all the necessary F10 RPMs and said it was ready for reboot. I rebooted into the installer and was greeted with an error message saying it couldn't find the RPM repository. I surmised that the installer hadn't mounted my /var partition (Preupgrade creates a local RPM repository at /var/cache/yum/preupgrade/). I did some searching and found Bugzilla bug 473782, which describes this exact problem. The fix was to reboot back into Fedora 9 and install Preupgrade 1.0.1-1 from the testing repository with the following command:
I did a yum update and then launched preupgrade. It downloaded all the necessary F10 RPMs and said it was ready for reboot. I rebooted into the installer and was greeted with an error message saying it couldn't find the RPM repository. I surmised that the installer hadn't mounted my /var partition (Preupgrade creates a local RPM repository at /var/cache/yum/preupgrade/). I did some searching and found Bugzilla bug 473782, which describes this exact problem. The fix was to reboot back into Fedora 9 and install Preupgrade 1.0.1-1 from the testing repository with the following command:
yum --enablerepo=updates-testing-newkey update preupgrade
I then launched Preupgrade again, rebooted into the installer, and successfully upgraded from Fedora 9 to Fedora 10. I rebooted into Fedora 10 and did a full yum update. I then noticed that I couldn't SSH into this Fedora 10 machine using SSH keys anymore. I did some more searching and found Bugzilla bug 473014. It seems that the upgrade process changes the SELinux security context on the user .ssh directories. The fix is to run the following command as root:
Haven't seen any other problems so far.
restorecon -r /home/*/.ssh
Subscribe to:
Posts (Atom)