Since I updated the "
Installing Snort 3.0 Beta on Ubuntu 8.04" post to work with Snort 3.0 Beta 3, here's the update for the "
Integrating Snort 3.0 (SnortSP) and Sguil in 3 Steps" post. Since the original post,
NSMnow 1.3.5 has been released, so the URL has been updated in the recipe to reflect this new version. Also, there appears to be a bug in the current sspiffy.sh whereby it configures the dsrc type to be "file" instead of "pcap". I added a quick one-liner to correct this in the snort.lua file.
Please note that if you have an existing NSMnow installation, following this recipe may or may not work. This recipe is designed for new NSMnow installations.
The best open source tool to manage Snort alerts is
Sguil and the easiest way to install Sguil is using
NSMnow. NSMnow automatically installs and configures barnyard2 (compatible with SnortSP's unfied2 format), sancp, Sguil, and Snort 2.x. We're going to replace NSMnow's snort alert process with Snort 3.0.
This quick recipe assumes that you're running on Ubuntu 8.04 and your primary network interface is eth0. You should be able to copy/paste each of the three code blocks into your terminal.
Obligatory disclaimer: I offer no warranty of any kind. If this breaks your box, you get to keep both pieces.
Step 1: Get root privileges##########################
sudo -i
##########################
Step 2: Install NSMnow
##########################
mkdir /usr/local/src/NSMnow
cd /usr/local/src/NSMnow
wget http://www.securixlive.com/download/nsmnow/NSMnow-1.3.5.tar.gz
tar zxvf NSMnow-1.3.5.tar.gz
./NSMnow -i -y
##########################
Step 3: Configure NSMnow and SnortSP and start##########################
if ! grep "/nsm/server_data/server1/load" /etc/apparmor.d/usr.sbin.mysqld > /dev/null
then
sed -i 's|}| /nsm/server_data/server1/load/* r,|g' /etc/apparmor.d/usr.sbin.mysqld
echo "}" >> /etc/apparmor.d/usr.sbin.mysqld
fi
/etc/init.d/apparmor restart
/usr/local/sbin/nsm --server --start
/usr/local/sbin/nsm_sensor_ps-start --skip-snort-alert
mkdir /etc/snortsp_alert
cd /etc/snortsp_alert
cp -R /etc/nsm/sensor1/* .
mv snort.conf snort_orig.conf
sspiffy.sh /usr/local -c snort_orig.conf -i eth0
sed -i 's|type="file"|type="pcap"|g' snort.lua
grep -v "sameip" rules/bad-traffic.rules > rules/bad-traffic.rules.2
rm -f rules/bad-traffic.rules
mv rules/bad-traffic.rules.2 rules/bad-traffic.rules
snortsp -C -L snort.lua
##########################
Snort 3.0 is now capturing packets on eth0 and analyzing them. Let's verify that now.
Launch the Sguil client by opening a new terminal and typing the following:
##########################
sguil.tk
##########################
When prompted, login to Sguil using the default credentials:
Username: sguil
Password: password
Next, create some alerts by opening a browser and going to:
http://www.testmyids.com
Finally, go into the Sguil console and you should see two new alerts:
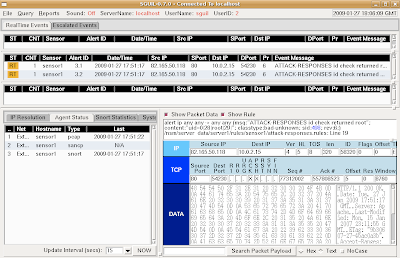
This demonstrates that SnortSP is capturing packets, analyzing them with the Snort 2.8.2 Detection Engine, and outputting in unified2 format, which is then read by Barnyard2 and inserted into the Sguil database.
When finished, return to your SnortSP window and press ctrl-c to terminate the SnortSP process. Then type "nsm --all --stop" to terminate all NSMnow processes.
